Style Selection Window
When you click on objects in a View, a side Selection Window opens that you can configure according to your wishes. There are various functions and settings that can be selected.
Preprocessing data Anchor
The data source of the Selection Window is always a layer. Thus, only attributes that are also stored at the Layer in question can be queried in a View.
If you want to store additional attributes at the Layer compared to the source data (e.g. a link), you can do this via the PlexMap Switchboard. Corresponding functions can be found in the namespace "properties" (like setting an attribute with Set Attribute).
Selection Window configuration Anchor
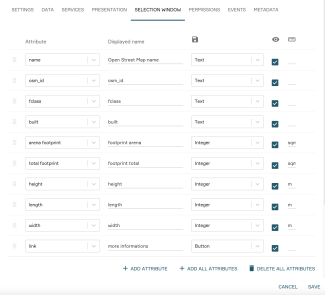
First, navigate to the "Layer" main menu. In the settings of a layer (gearwheel symbol), navigate to the menu item "Selection Window". By clicking on "Add all attributes" you can add all attributes of a layer to the list view for further editing. Alternatively, you can also load only individual attributes into the list view via "Add Attribute". All attributes displayed in the list view will later appear in the Selection Window of this Layer.
Via "Delete all attributes" you can remove all attributes from the list view and thus from the Selection Window. If you do not want individual attributes to be displayed in the viewer, remove the check mark in the column with the eye symbol for this purpose.
Further functions of the list view:
- Displayed name: Here you can define an attribute name for display in the viewer. With this function you can avoid the partly cryptic names of the source data (e.g. use "Parcelnumber" instead of "Prl_Nr"). If the field is not filled in, PlexMap uses the attribute label from the source file.
- Add unit: If a unit is to be assigned to the displayed attribute, it can be entered in the rightmost column (e.g. "km", "m", "cm").
- Delete Attribute: By clicking on the three dots on the far right of a row, you can delete the entry. The attribute is only deleted for the display, but remains in the source file.
- Change order: The order of the attributes displayed in the viewer can be changed by moving the rows with the field on the far left of a row.
Select display type: By clicking on the drop-down menu in the column with the "Save" icon, you can choose between different display types. The display type determines how the stored attribute is prepared for the Viewer. The following display types are possible:
- Texts: Representation of the attribute value as text.
- Integer: Representation of the attribute value as integer.
- Decimal number with one decimal place, decimal number with two decimal places: Representation of the attribute value as a decimal number with one or two decimal places.
- Button: Representation of the attribute value as a button. Use this option if the attribute in question contains a link. In the viewer, "Displayed name" is now displayed as a button in the query window. By clicking on the button, the stored link opens in a new tab.
- Button (iFrame): Compared to the "Button" option, the deposited link is opened here directly in the viewer.
- Link: Compared to the "Button" option, the stored link is displayed as an attribute value without further processing. Clicking on the link opens it in a new tab.
More settings Anchor
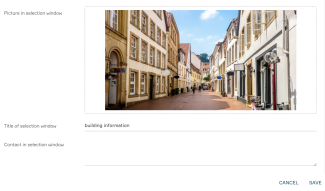
The "Image in query window" field allows you to drag and drop an image to be displayed in the query window.
If the query window is to be given a specific title, this can be added in the "Title of query window" field. If the field remains empty, the layer name will be taken as the title.
If, for example, a contact person matching the topic is to be stored in the query window, use the "Contact in query window" field. Here you can enter the contact details. In the viewer, you can access this data later via the "Person" icon in the upper right corner of the query window.

