PlexMap Planer
The following describes the operation of the PlexMap Planner. Note: You need an appropriate license for PlexMap 3D or PlexMap 2D and for PlexMap Planner to use the tools.
Create or load sketches Anchor
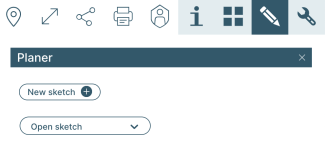
In the upper right area of the 3D viewer you will find a pencil icon. Click on the icon to open the PlexMap Planner.
The two buttons "New Sketch" and "Open Sketch" will appear. Click "New Sketch" to create a new sketch or "Open Sketch" to load an existing sketch.
When you have thus opened an existing sketch or created a new sketch, the actual planner opens.
Each sketch appears in the layer tree of the PlexMap Planner. In addition, a sketch also appears in the layer tree of PlexMap 3D and can be switched on and off there (e.g. for a before/after comparison).
Edit sketch Anchor
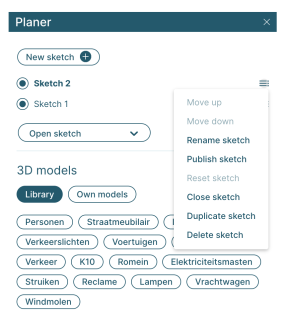
The context menu of your sketch (cf. screenshot) opens various editing options for a sketch:
Move up/down: These options are available if you have multiple sketches open at the same time. You can use them to move the selected sketch up or down in the layer tree.
Rename sketch: Use this function to give your sketch a unique name.
Publish sketch: Use this function to publish a finished sketch as a view with one click, which will henceforth be accessible via its own link. If you have licensed the PlexMap backend, the generated view is also available in the backend under "Views" and can be further edited there.
Reset Sketch: Use this function to reset all changes you have made in this session.
Close sketch: Use this function to close the sketch. All changes will be saved automatically.
Duplicate sketch: You can use this function to save all the objects that you have placed and changed in your sketch in a new sketch and add new objects to it.
Delete sketch: Use this option to delete your sketch. Attention: The deletion cannot be undone.
Note: All changes in a sketch are saved automatically. It is not necessary/possible to save a sketch manually.
Add 3D models to the sketch Anchor
If you use PlexMap Planner from within PlexMap 3D, you can load existing 3D models from your 3D library or your own models on your PC into a sketch. This functionality is not available from within PlexMap 2D.
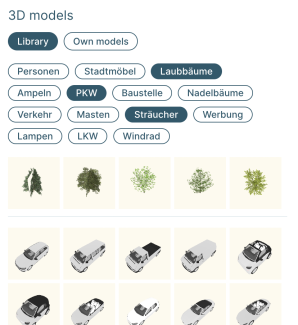
To load models from the 3D library, click Library and then click a desired category (e.g. Cars). Then click on a model and move the mouse pointer to the place where you want to place the model. Left-click to place the selected model. Now use the planner tools to rotate the model, for example (see Tools section).
To load a 3D model from your computer into the planner, click on "Own models" and then upload a model saved on your PC. After the model has been uploaded, you can place it as described. For uploading a model all formats supported by PlexMap 3D are supported.

Tools Anchor
All available planner tools are described below. You can find the tools on the right edge of the planner. Note: For the tools further down you have to scroll in the tool list.
Select Object: Selects a previously placed object by left mouse click. Depending on the type of object selected, additional editing options may appear. For example, for a 2D polygon, you can change the colors of the polygon this way.
Capture point: Captures a point on the map by left mouse click.
Capture line: Captures by left mouse click a base point of a line in the map. Double-click to finish capturing the line.
Note: In the upper right part of the planner tools appear with which you can define rules for your capture (e.g. angle or length defaults).
Capture polygon: Captures a base point of a polygon in the map by left mouse click. Double-click to finish capturing the polygon.
Note: In the upper right part of the planner, tools appear with which you can define rules for your acquisition (e.g. angle or length defaults).
Extrude object: Captures a base point of a polygon in the map by left mouse click. Double-click to finish capturing the polygon. Then drag upwards from the center of the polygon while holding down the left mouse button to extrude the drawn polygon to a desired height.
Note: In the upper right part of the planner, tools appear with which you can define rules for your capture (e.g. angle or length defaults).
Cut polygon: Capture a polygon in the map as described. All 3D objects that are located within the polygon on the terrain are now hidden.
Excavation: As described, capture a polygon in the map. Then, while holding down the left mouse button, drag downwards or upwards from the center of the polygon to define the desired depth or height of your "excavation".
Edit geometries: Click on a previously drawn point, line, polygon or 3D object. The object will now be highlighted and you can move the vertices of the object by holding down the left mouse button. Deselect the "Edit Geometries" tool to finish editing.
Rotate object: Click on a 3D object and then hold down the left mouse button and rotate the mouse in any direction. The object will rotate accordingly.
Scale object: Click on a 3D object and then hold down the left mouse button and drag the mouse in any direction. The object will get bigger or smaller accordingly.
Note: In the upper right part of the planner, tools appear with which you can define rules for your scaling.
Move object: Click on a 3D object and then hold down the left mouse button and drag the mouse in any direction. The object will be moved accordingly.
Raise object: Click a 3D object and then hold down the left mouse button and drag the mouse up or down. The object will be raised or lowered accordingly.
Duplicate object: After you select the tool, the last placed 3D object will be duplicated with a left mouse click.
Add label: With a left mouse click, you can use this tool to place a text defined in the editing area at the top right.
Delete object: This function deletes the object selected with the left mouse button.
Hide object: This function hides the object selected with the left mouse button.
Show object: This function shows the object selected with the left mouse button.


