Improving the performance of a 3D view
In the following section, you will learn how to optimize the performance of a 3D view. If your 3D view is not performing well, be sure to follow these basic tips.
Reduce amount of acitve Layers Anchor
Only those Layers should be active, which are necessary for the desired visualization purpose. Overlapping MapProxy Layers, such as base maps and orthophotos, should therefore be marked as exclusive in the View Settings (see Layers).
Reduce maximum zoom levels for image and terrain Layers Anchor
For each image and terrain Layer, the maximum zoom level should be adapted individually to the visualization purpose. Especially for complex 3D Views, the maximum zoom level is not required for each Layer. The highest zoom Level can be set for MapProxy and Terrain layers under "Edit Layer" in the Layer Configuration under "Advanced settings".
Individuelle Layer Empfehlung bei 3D-Mesh-Modellen:
- Orthophotos associated with the mesh model: 18 - 19
- Background maps or orthophotos of the surrounding area: 15 - 16
- Terrain: 17 - 18

Seed MapProxy Layer Anchor
Seeding is the complete caching of an entire Layer. MapProxy is also functional without seeding, but seeding ensures that the individual tiles of a Layer can be delivered without delay.
Optimally, each MapProxy Layer should be seeded up to the maximum zoom level set. Seeding can be activated in the Layer Configurations under "Generate Tiles on Save". For high maximum zoom levels, the creation of the Layer can be very time-consuming and take several hours or days.

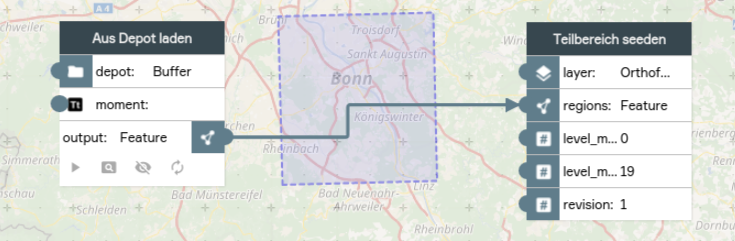
Therefore, for high maximum zoom levels and/or for MapProxy Layers with large areas, it may be useful to use the switchboard function "Seed subarea". This function requires as input parameters the desired Layer, as well as the Layer revision, a minimum and a maximum zoom level and a region as 2D feature. This function has the advantage that the process of seeding is limited to one region. In addition, the feature can also be applied to already created layers. In this case, already created layers can also be used already unseeded.
Configuration 3D viewer Anchor
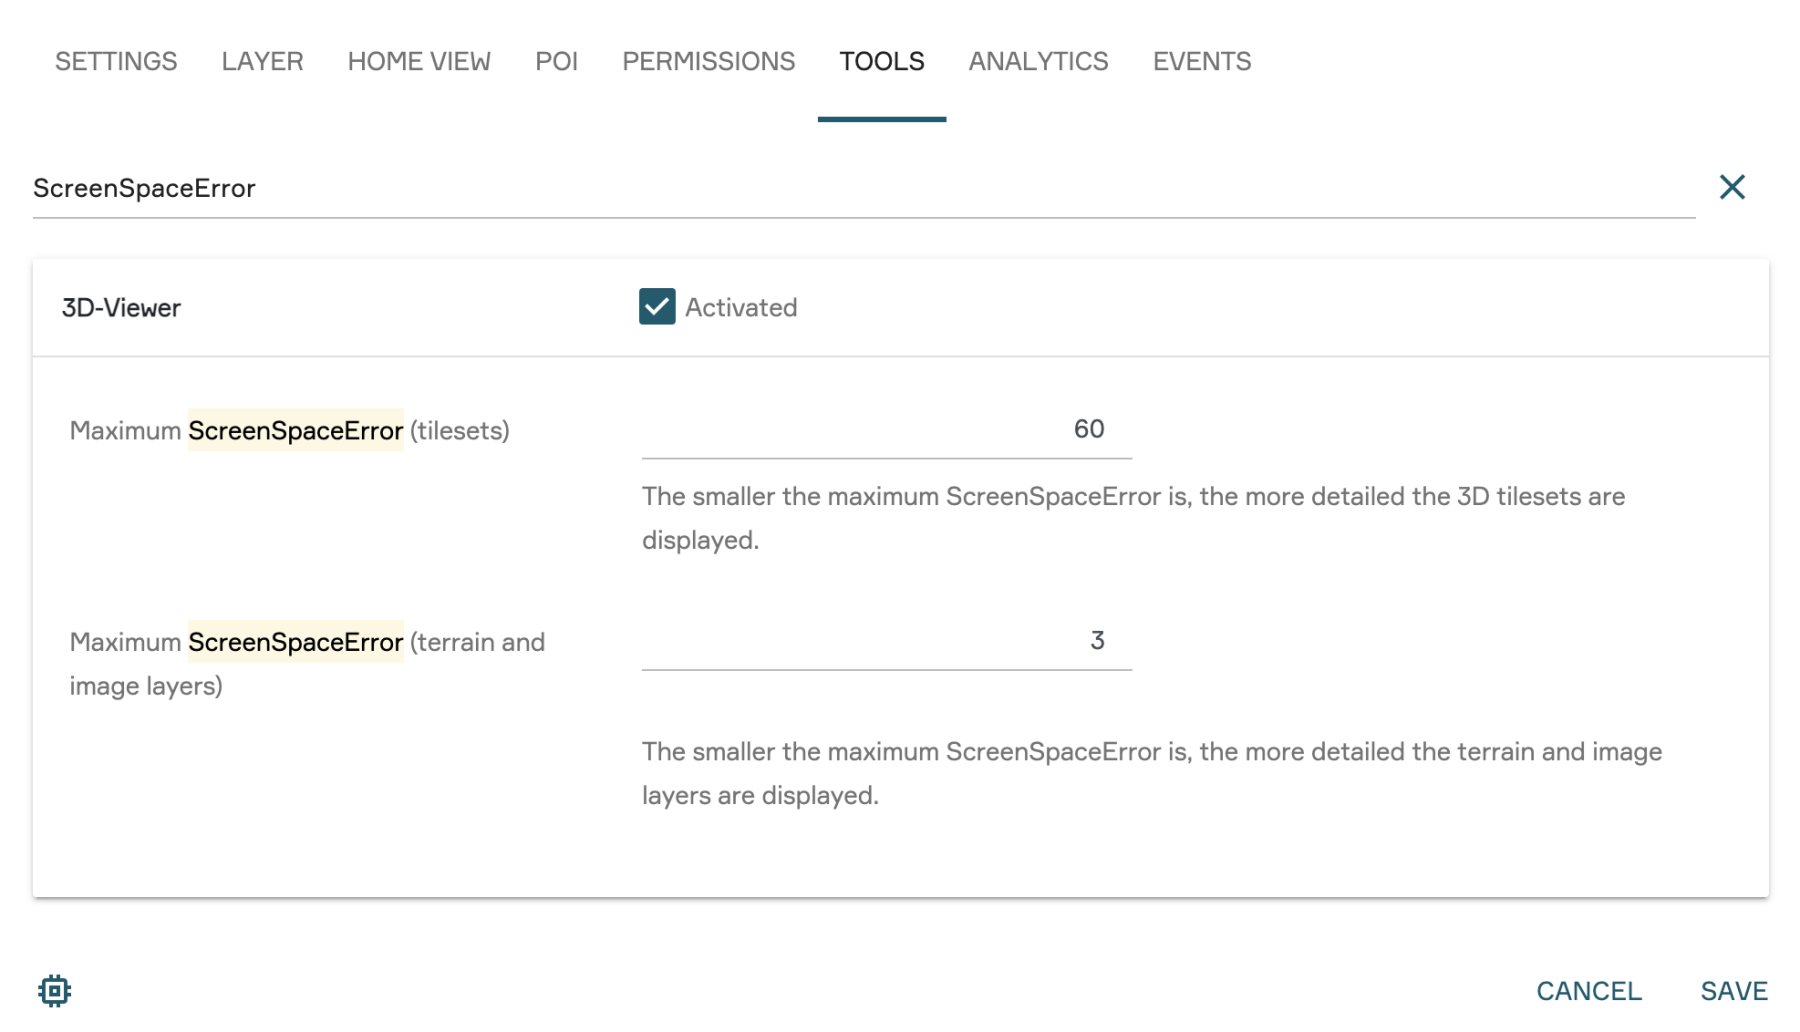
In the View settings, under the "Tools" tab, in the "3D Viewer" section, you will find various settings for the loading and tiling behavior of 3D tiles and image and terrain Layers.
The section shown in the following figure represents the recommended settings for a performant and yet detailed mesh model. The optimal settings for textured and for non-textured LOD2 models may differ.
Maximum ScreenSpaceError (SSE) Anchor
The Screen Space Error is an important parameter that controls the quality of the display of 3D models, particularly the 3D Tiles, on the screen.
The smaller this value is, the more detailed 3D Tiles as well as image and terrain layers are displayed in the depth of the image.
Screen Space Error of the View Anchor
The ScreenSpace Error (SSE) that you set for the entire View within the View settings in the 3D viewer under Tools applies by default to all layers displayed in that View. It serves as the base quality value and determines the maximum tolerance for visual error for all content. A standard value range here is between 50 and 80.
Screen Space Error of the Layer Anchor
If you define a ScreenSpace Error specifically for an individual layer, it will be prioritized and override the default View setting only for that single layer. This allows you to control the visual quality of specific layers independently of the general View setting. In the layer settings, you can adjust the parameter under Tiling.
For 3D Tiles Layer, the ScreenSpace Error should be between 20 (for detailed 3D Mesh) and 80 (for LoD2 buildings or vegetation).
For Image and Terrain Layers, the value should be between 1.5 and 4.
To optimize performance while still presenting the 3D View as detailed as possible, the ScreenSpace Error should be increased gradually until the desired result is achieved.
