Build 3D tree cadastre
This tutorial describes how to derive a 3D tree cadastre from a 2D tree cadastre for use in PlexMap 3D.
To derive a 3D tree cadastre, the following input data is required:
Import input data Anchor
In the first step, you need to import the 3D tree models and 2D tree cadastre into PlexMap Magazine.
Create a depot of type Mesh for all 3D tree models you want to use and load each tree model in the first step as described in the Import data section.
Then import the 2D tree model into a new depot of data type Feature).
If there is no DTM in your instance yet, import a DTM into a depot of type Grid.
Create simple 3D tree cadastre Anchor
Designing 3D tree cadastres can require complex Switchboards. In the first step, this tutorial describes the design of a simple 3D tree cadastre. Starting from this state, the complexity can be increased as desired afterwards.
The goal of this simple 3D tree cadastre is to always place the same 3D tree at the locations of the 2D tree cadastre. For more complex 3D tree inventories, the 3D trees can be scaled using attributes such as tree height and crown diameter. It is also possible to place individual trees per tree type.
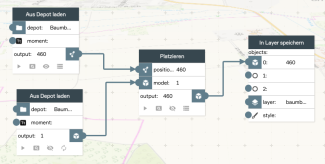
To build the simple 3D tree cadastre, a new Switchboard is created first. With the function Place the selected 3D tree is placed at each of the tree coordinates (in this example 460 tree coordinates).
Place 3D trees on the DTM Anchor
So far, the placed 3D trees do not have a height yet and will therefore not be visible in the 3D viewer, since they are located below the terrain.
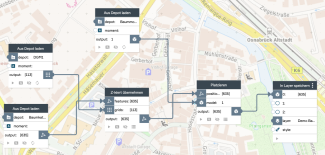
To avoid this, the next step is to pick up the height of the DTM at each tree coordinate and save it to the 3D tree. For this the function Adopt z-value is used. The result is passed to the already existing function Place.
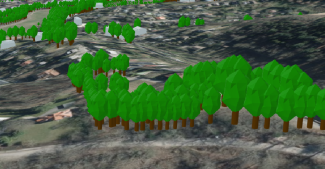
As a result, all 3D trees are now placed exactly on the DTM and are thus visible in the 3D viewer.
Define individual tree height Anchor
In the state implemented so far, all 3D trees are the same size. In order to make the 3D tree catalog more realistic, the 3D trees should now be scaled to their real size in the next step.
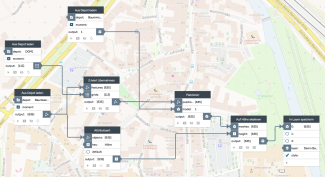
To do this, the Scale to Height function is used to scale the height of the 3D trees to the "height" attribute stored in the 2D tree catalog (here it is "Höhe"). As a result, each 3D tree now has its real height.
If there is no height attribute in the 2D tree cadastre used, the respective tree height is ideally derived from a digital surface model (requires PlexMap Points). Alternatively, a random or rule-based tree height can be defined.
Result & approaches for further work Anchor
The simple 3D tree catalog is now ready and can be displayed in any 3D View. If desired, you can set the Layer for the 3D tree cadastre in the view editor to "Queryable" so that the stored attributes of the 2D tree cadastre can be queried in the 3D viewer.
There are numerous options for further designing the 3D tree cadastre. The next logical step would be to link tree type and tree model. In the simplest case, different 3D trees are used for deciduous and coniferous trees respectively. However, it is also possible to use an individual 3D tree for each tree species stored in the 2D tree cadastre....
Have you created a sophisticated switchboard for a 3D tree cadastre? Feel free to share your workflow in PlexMap Connect. Since almost all PlexMap customers use a 3D tree cadastre, many other users will be happy about it!


