Publish oblique aerial images with PlexMap Oblique
The following sections discuss what data is needed to process oblique aerial imagery in PlexMap, how to convert oblique aerial imagery footprints to the Oblique-Trapeze data type, and finally how to publish oblique aerial imagery in a View.
Source data Anchor
To display oblique aerial images in PlexMap Oblique, the following data should be available:
Footprints: polygons of the image corner coordinates of your oblique aerial images with position and height (e.g. in shape format)Match-AT-Projektdatei(camera constant, cardinal direction, image name, image size (pixels), image width (pixels), projection center (x, y, z))Schrägluftbilder: in a common image format. Preferably as JPG200, as this file format allows high compression and the display of transparency.
Create trapezoids Anchor
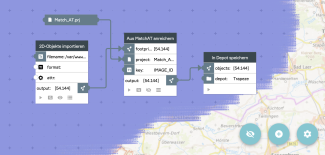
The Enrich from MatchAT function converts the footprints of the Feature data type to the Oblique-Trapeze data type.
The footprints can be loaded directly into the switchboard from the server using the feature_import function.
The following data is included in the Match AT project file:
Camera constantCardinal directionImage nameImage size (Pixel)Image width (Pixel)Porjection center (x, y, z)
Based on the image name (here: IMAGE_ID), the corresponding data can be assigned to the trapezoids via the key parameter. The Match-AT thus enables the exact positioning of the oblique images in PlexMap Oblique.
Subsequently, the trapezoids are stored in a depot with the data type Oblique-Trapeze for further processing.
Save to Layer Anchor
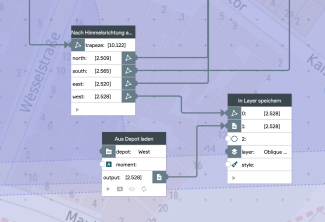
It is possible to save the trapezoids and the images in one Layer per cardinal direction.
For this the trapezoids are split with the function Split by Direction and stored with the respective oblique images in a Layer of the type Oblique-Images. This way four Layers are represented in the Layer Tree.
However, all trapezoids and oblique images of all cardinal directions can be stored into one Layer.
View settings Anchor
Shift in Oblique mode
In mountainous landscapes, with large height differences in the flown area, smaller shifts can occur in Oblique mode when jumping to coordinates or addresses.
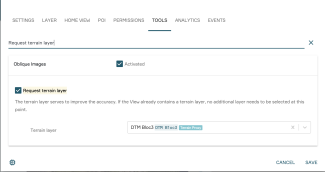
These are corrected by a function in the layer settings. Under "Tools -> Request terrain layer", activate a layer as "Terrain layer" in which a terrain was saved.
This allows the shifts and minor inaccuracies in the view to be corrected.
The following layer types can be used for this:
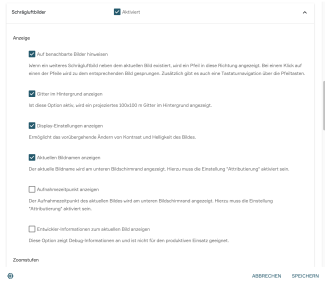
Further optional settings can be made as required.


