Generate a "Mesh Highlight"
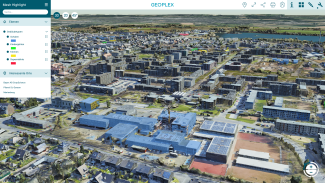
Similar to a Mesh+, the concept "Mesh Highlight" pursues the goal of turning conventional mesh models without semantics into queryable 3D objects (cf. image). In this way, the advantages of queryable CityGML models can be easily combined with the photorealism of 3D meshes. This concept is now widely used, for example in the cities of Stuttgart and Bonn.
"Mesh Highlight" and "Mesh+" are created in the PlexMap Switchboard and extend an existing 3D mesh e.g. with semantics from CityGML. The result is queryable and photorealistic 3D models in the viewer.
In addition to a "Mesh+", objects in a 3D mesh can also be highlighted in colour using "Mesh Highlight" (see illustration).
Connecting the mesh model and attributes Anchor
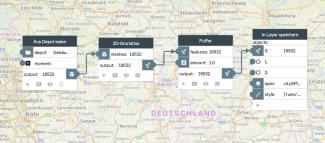
Initially, 2D building floor plans of type Feature are required as a data source. Depending on which attributes the "Mesh Highlight" is to display later, ALKIS, OpenStreetMap or CityGML data, for example, can be used to create the "Mesh Highlight".
In the case of CityGML data, the two-dimensional outline of the 3D buildings must first be created with the help of the function Outline.
Since in 3D meshes e.g. roof overhangs and balconies regularly project beyond the ground plan of the buildings, a buffer of approx. 1 metre should be placed around the 2D data. Use the function Buffer for this. Then the buffered 2D data is saved in a layer of the type 2D-Feature.
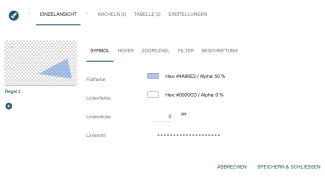
When creating the layer with Store in Layer, the buffered 2D data must now be coloured under "style" so that they are later visible in the viewer. To colour the 2D polygons, any fill colour is chosen. The alpha value should be at least 20% so that the polygons are also clearly visible in the viewer later.
The layer created in this way can then be loaded into the view with the mesh model. Please do not forget to set the layer to "queryable" in the layer menu of the view configuration.
Now the stored attributes can be queried in the 3D viewer by clicking on the mesh. In addition, contents (e.g. building categories) can be highlighted in colour in the viewer. If necessary, you can also style the query window that appears (e.g. rename or hide attributes). You can find out how to do this in the tutorial Styling the query window.


