Set up POIs and flight tours
In PlexMap 2D and PlexMap 3D, a collection of Points of Interest (POI) can be displayed below the layer tree. PlexMap 3D also allows the display and playback of flight tours.
A list of POIs is useful, for example, to provide users with a quick way to access selected map content or to highlight frequently visited views.
Flight tours are a useful stylistic device in a tourist context, for example, and are also suitable for creating videos using external screen capture software.
Furthermore, this feature can be useful to prepare predefined Views (e.g. North and South view of a construction project) or routes for a presentation.
Set up POI's in the View Editor Anchor
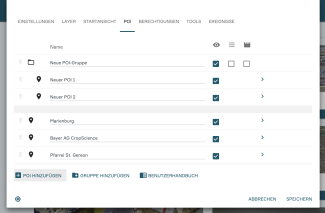
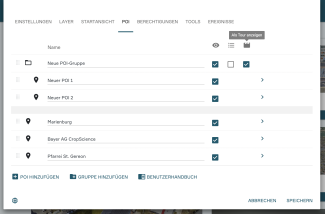
POIs can be created and edited in the View Editor under the "POI" menu item. To enter a new POI, first click on the "Add POI" button. The new POI will now appear as a new entry with the name "POI" in your POI list. You can now assign a descriptive name for your POI instead of "POI".
Now click on the small arrow on the far right in the line of "POI". An editor appears where you can determine the position of your POI by entering geo- and 3D-coordinates. However, it is much easier to use a Vista link for this purpose. To do this, position yourself in the viewer at the desired location and press the "Share link" button. Now copy the Vista link generated there and paste it into the POI editor. Your POI will now be placed at the location defined in the viewer.
You can also create a POI group using the "Add Group" button. Drag already created POIs over the hatched area left of "POI" into the new group to fill it. This way you can also change the hierarchy of the POIs.
Using the column with the eye symbol it is possible to make POIs visible or invisible in the viewer. In addition, for each POI group you can specify whether it should be initially expanded (table icon) or not. Using the film flip tool, a POI can be converted into a flight tour (see Chapter: Set up flight tours via the PlexMap 3D tool "Clapperboard").
Enable POI in Viewer Anchor
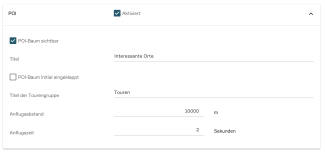
In order for the POIs to appear in the viewer, the POI component must be activated in the view editor under "Tools" and the option "POI tree visible" must be activated.
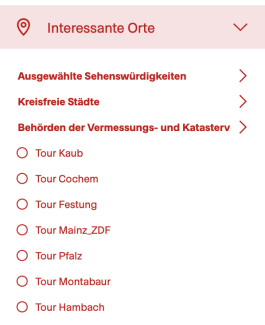
Here you can also assign a title for your POI list (e.g. "interesting places"). The POI tree can also be initially collapsed.
You can also assign a title for any flight tours you may have created. In addition, the approach distance and approach time for flight tours can be defined here.
Set up flight tours in the POI editor Anchor
Simple flight tours can also be generated in the View Editor. To do this, individual POIs are first collected in a POI folder. For the desired POI folder, the option "Show as tour" is selected.
In the settings for the individual POIs in the POI folder, you can also define for each POI how long the dwell time per POI should be and how long the flight duration to the next POI should be. You can access the POI settings by clicking on the small arrow on the far right of each line in the POI Editor.
In the viewer, the POI folder now appears as a flight tour in which the individual POIs are approached in sequence.
Set up flight tours via the PlexMap Switchboard Anchor
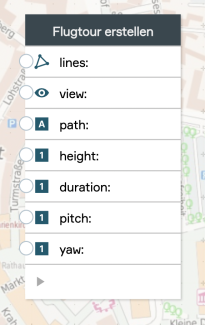
To create a flight tour in the PlexMap Switchboard, a flight route (line feature) of the type Feature is required. The individual points of the line are then flown to one after the other in the flight tour.
The line for your flight tour can be an already existing line, which you load from the PlexMap Magazine into the input "lines" of the function Create Flight Tour in your switchboard. Alternatively, you can draw a line in the switchboard itself and use it as the input file for your flight tour.
In the input "view" you specify the view ID of the view in which your flight tour should be displayed. In the input "path" you assign a name for your flight tour. With the parameters "height", "duration" (duration of stay in seconds at a base point of the flight gate), "pitch" (roll angle) and "yaw" (yaw angle) you can further specify your tour. The orientation of the flight tour is calculated based on the geometry of your input line.
The flight tour created in this way is now located in the "POI" area of the view editor of the view specified in your switchboard and can be activated there.
Set up flight tours via the PlexMap 3D tool "Clapperboard" Anchor
Provided that PlexMap 3D and the 3D ProTools are licensed, you have access to the tool "Clapperboard". Besides a simple rotation, the tool allows the interactive creation of flight tours in PlexMap 3D.
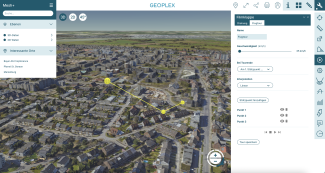
The tool is largely self-explanatory (cf. image). By clicking on "Add base point" the current viewer view is taken over as base point for your flight tour. Each base point is displayed as a sphere in 3D space. A line shows the defined flight route. After you have set several support points, the defined tour can be saved.
The saved tour is now visible in the viewer under "Points of interest" (POI) for users who are logged in to PlexMap and for users who are not logged in. For users who are logged in to PlexMap, the defined flight tour is also saved as a layer in the PlexMap backend. In this way, a flight route defined in this way can also be added to a view as a fixed component.
